As my colleague Wayne Dobbs of Hardwired Tactical Shooting says, there are three fundamentals of handgun shooting that can make you or break you in a defensive situation; grip, sights, and trigger [manipulation]. I would also add follow through, as a student who came back today from the elite Rogers Shooting School called to mention to me.
For this segment, let’s look at the autoloading pistol grip discussion contained in Advanced Pistol Practice.
 The proper grip for any handgun should accomplish several objectives:
- Maximize our hand friction on the handgun. The way we prevent the handgun from moving around in our hand(s) is simply via friction. Therefore, the more hand surface we have in contact with the gun, the more friction we can achieve.
- Minimize the gun’s motion during recoil by stabilizing the supporting joints, principally the wrists, when the gun fires.
- Reduce the distance between the line of the handgun’s bore and our hands to the smallest amount possible. This diminishes the rotational torque generated by the handgun upon firing.
After establishing the appropriate grip, a series of index points can be used to feel when the grip has been properly achieved. Especially in defensive encounters, there is no time for visually checking whether the proper grip is in place. Having a set of index points allows a shooter to establish a proper firing grip in the holster and during the drawstroke to know that the grip is as it should be.
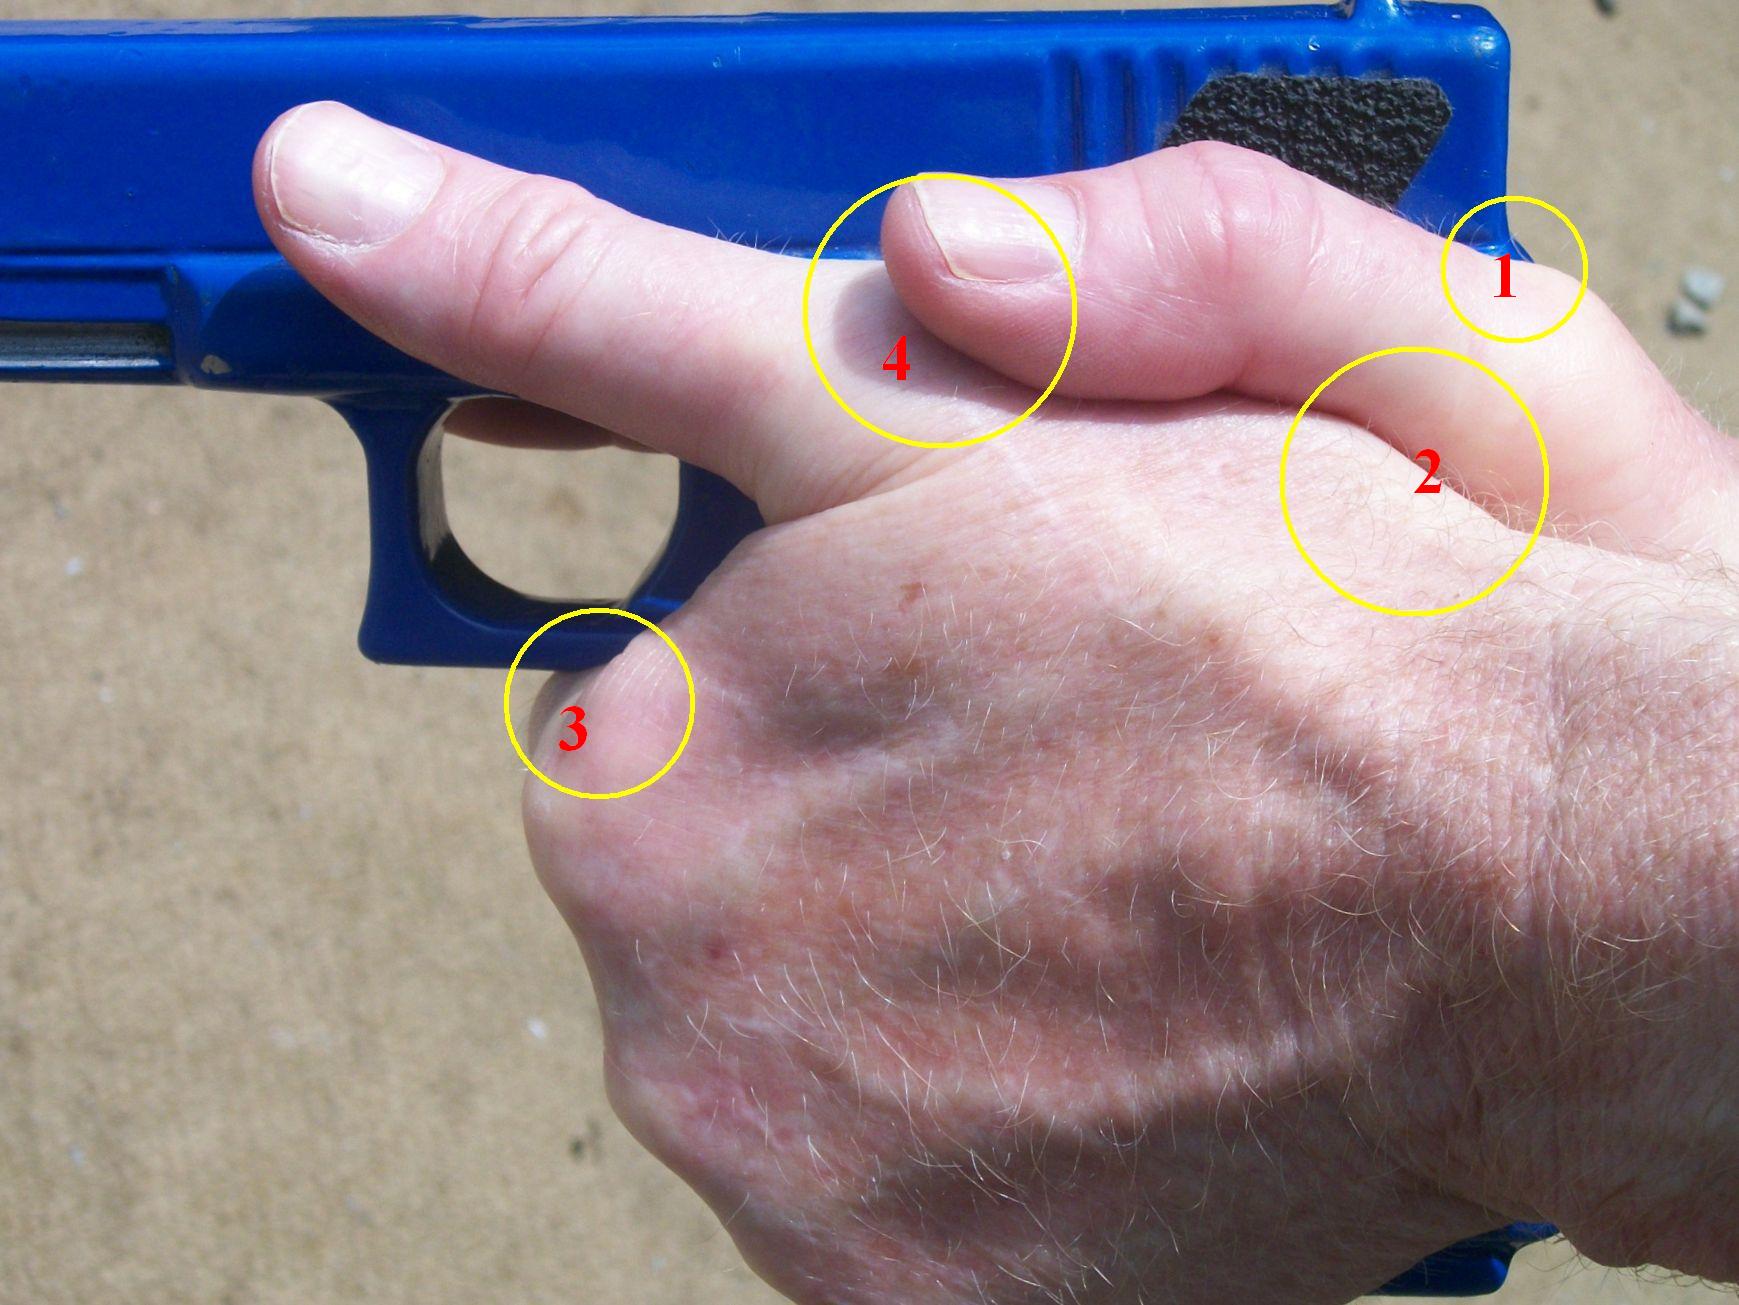
With an autoloading pistol, this grip is commonly referred to as the ‘thumbs forward grip.’ Being aware of four specific index points will allow a shooter to know that a proper grip has been achieved without having to visually verify it. There are nuances to this grip that sometimes escape even experienced shooters, however. The first three index points are essentially the same for all shooters. The fourth index point may vary among shooters, dependent on individual physiology.
There is still debate as to how hard the fingers of the support hand should grip the firing hand. In any case, they should certainly grip firmly enough to not break free of the firing hand during recoil.
Web of the firing hand
The firing hand should be as high as possible on the back strap of the pistol. Gripping the pistol low increases the rotational torque of the pistol in the hand. So the first index point is the relationship between the tang of the pistol and the web of the hand. For most people, there should be no space between the tang and the web. The shape of a few people’s hands will leave a small space even when the gun is gripped as high as possible but this space should be minimal. Those with large hands may experience contact by the slide on the firing hand when it is held this high. The use of a beavertail or Grip Force Adapter on the Glock pistol can reduce this contact.
 Bases of the thumbs mate
As much of the support hand as possible should make contact with the pistol to maximize the friction the support hand can generate on the pistol. To achieve maximum contact, the bases of both thumbs should make contact firmly. This is the second index point. It is common to see space in shooters’ grips between the bases of the thumbs. This is a clear indicator that the support hand is not making maximum contact with the pistol.
 Support trigger finger touches trigger guard
The support hand should be as high as possible on the pistol to reduce rotational torque. Lightly touching the underside of the trigger guard with the side of the support hand trigger finger is the third index point of a proper grip. When the support hand trigger finger touches the trigger guard, the support hand is properly high on the gun. The ‘cup and saucer’ hold used by most TV and movie actors is an excellent demonstration of how NOT to form the grip of the support hand. Because blanks generate no recoil, controlling the handgun is not of importance to them. The ‘cup and saucer’ method does keep the actor’s arms down and allows a better view of the face, which is why it is used so often in that format.
 Wrist is extended downward
Stabilizing the support wrist is a key component of a proper grip to achieve recoil control. This is the element that many people do incorrectly when forming the grip. The wrist is most stable when it is extended downward.
 Angled downward in relation to bore
So when the support hand is applied to the pistol to form the grip, it should be angled downward in relation to the line of the pistol’s bore.
 Wrist should not be straight
The downward extension is initially slightly uncomfortable and feels somewhat unnatural. As a result, shooters tend to unconsciously keep the wrist of the support hand straight instead of extending it downward.
 Wrist incorrect
So, it is common to see the wrist held almost straight when the support hand is applied to form the grip. This is incorrect and does not provide much stability to the pistol when it fires.
 Firing thumb on support thumb
Consequently, the fourth index point is the contact point of the firing thumb on the support thumb. By knowing location of this point when the support wrist is properly extended downward, a shooter can immediately tell whether or not the best grip has been achieved. For most shooters, the tip of the firing hand thumb should be aligned in the area of the base knuckle of the support hand, rather than on top of the knuckle, as is commonly seen. The support hand thumb can either float free or lightly touch the frame of the pistol. It should NOT apply any significant sideways pressure to the pistol frame, as this can create a shift in the pistol’s point of impact.
 Two components of fourth index point
The fourth index point has two components. First, it verifies that the support wrist is extended downward. Second, it is located such that the firing hand thumb clears the slide stop to the maximum extent possible.
 If the firing hand thumb is placed directly alongside the slide of the pistol, it’s easy for that thumb to prevent the slide stop from functioning. This will prevent the slide from locking back after the last shot fires. The subsequent click upon a firing attempt when the slide does not lock back can be either annoying or fatal, depending on circumstance.
For most shooters, the firing thumb should be placed directly in line with the support thumb, as opposed to beside it near the slide. Learning to place the firing thumb in line with the support thumb will minimize the possibility of interfering with the slide stop.
In summary, the four index points of the proper grip on an autoloading pistol are:
- Web of firing hand meets tang of pistol.
- Bases of both thumbs mate closely.
- Support hand trigger finger makes contact with trigger guard.
- Contact point of the firing thumb on the support thumb.
 Developing a proper grip takes some effort and analysis but yields big dividends in terms of your shooting ability. Note that the issue of sights is important enough for me to cut a rear sight notch in my blue guns. I cannot abide a gun without functional sights, even when it is an inert gun. The sights discussion is for another time, however.

Reblogged this on Brittius.
I went through the Pistol Practice Program in anticipation of establishing a baseline tomorrow at the range. I used my Laserlyte system to run through the basic dry fire session. I have to admit being a little unclear on what a high ready position looks like with a pistol. Keep up the good work.
Good question. High ready –
1) pistol held in both hands,
2) sights in line with the target and placed underneath the dominant eye,
3) hands about pectoral level with the wrists touching the chest,
4) bore parallel to the ground.
Note that a full firing grip may or may not be formed at this point, depending on the flexibility of one’s wrists. If the firing grip is not completely formed at high ready, it is formed as the pistol is pushed to extension.
Reblogged this on The Obsession Engine and commented:
Fantastic stuff from my friend and instructor Claude Werner. I wish I had such clear instructions when I began shooting.
Thank you for provided clear illustrations to support your explanation. What is your position on resting the thumb of the trigger hand on the top of the safety (1911) ? This placement has become my index point and as I rework my grip I plan to eliminate it in favor of the application above.
Thank you
In the case of the 1911 and similarly safety equipped platforms, I am in favor of resting the thumb on the safety. I have seen the safety bumped on if it’s not. The slide stop is far enough forward that occluding its operation is not an issue.
Thank You for a great article, easy to understand and duplicate .
Reblogged this on Women and Guns and commented:
Excellent article on proper grip.
Thanks, I learned alot.
[…] Friday Fundamentals (Segment 3) Properly gripping an autoloading pistol […]
[…] […]
[…] Werner, at a local gun group meeting, and have also seen him shooting IDPA at a nearby range, this article presents four key reference points to be sure a shooter has a solid grip for pistol shooting, ones […]
[…] back isometric tension. When I later switched to running a Glock, I essentially adopted a modern thumbs forward grip (click the link to read an excellent explanation from Claude Werner, the Tactical Professor). […]